
How To Replace or Install a Garbage Disposal
I’m wouldn’t count myself as the handiest guy in the world but I can handle the garbage disposal and you can too. Of all the appliances in the house this one is easier to install than the washer machine. The short version: screw it on and plug it in.
Safety Concerns:
Before servicing a garbage disposal be sure to unplug it. Most likely it is plugged into a traditional outlet under the kitchen sink that is toggled by a switch. Simply unplug it.
How to Remove A Dead Disposal
 After disconnecting the disposal from electricity your next step will be to loosen the PVC pipe that connects the disposal to the rest of the drainage system. Most likely this is done by removing a few screws that push a metal plate up against the side of the disposal to keep a tight seal of the pipe against the disposal. Once these screws are removed and the plate is slid back you are set.
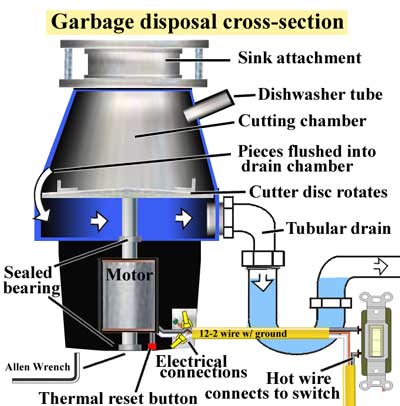
Next, Slowly twist the disposal counter clockwise from the bottom of the sink. You may need to apply a little “pressure” with a hammer to loosen it. This sink attachment isn’t complex and less than a half turn should be all it takes. Take caution as the disposal is heavy and it can drop suddenly if you aren’t ready to catch it as it comes loose from the sink.
Your new disposal probably won’t come with the electrical power cord so from the base of the disposal use a screwdriver and remove the three cables so you can reuse the power cord with the new machine.
How to Install a New Disposal
If you are not replacing an old disposal you may need to purchase a power cable as these do not come with most garbage disposals. You may also want to consider buying some plumbers putty if you don’t already have some. You can find a disposal, power cables, and other associated accessories at your average home repair store.
I like to start by wiring the electrical cables. If there is any doubt left by the color code, check the instruction manual that came with your new machine. Tighten all three cables down but DO NOT plug in the cable to the outlet until the installation is complete.
Position the disposal to tighten it onto the sink attachment. Ideally consider that as you turn it to tighten it you will want to opening for the drainage pipe to line up with where you pipe connected to the old disposal, or if this is a new install you will want to consider the piping connections accordingly. Tighten the disposal onto the sink attachment. A few gentle taps with a hammer will ensure it is firmly tightened.
Connect your PVC pipe. Some disposals vary but generally this is done by securing the pipe to the disposal with a large washer (came with the disposal) and a metal plate that fits over the pipe. Tighten down with provided screws. Later when you test your install if you witness water leaking at this connection you may need to apply plumbers putty here to ensure a water tight connection.
Plug your disposal into the power outlet and run water through it first without powering on the disposal. Look closely for any leaks. Run water for at least 2 minutes. After this initial test turn on the disposal with the water still running and continue to look for any leaks.
Congratulations. You are now more of a man and the children and woman of the household can look to you as the handy and reliable male you are!